Monday, July 26, 2010

Handmade Coffee Sleeve

I try to be as friendly to the environment as I possibly can, so when I know I'm going to buy coffee somewhere, I take a reusable mug. If I forget...I always have a coffee sleeve in my purse to use. {instead of the cardboard coffee sleeve}

The first coffee sleeve I started using was this one. I really like it a lot and mine has served me well...but I wanted one with a little more color {mine is gray} - something to help brighten my morning. So, I figured I'd make my own.

{Espresso, Yes!}

I found the fabric above at one of my new favorite places in Atlanta - Whipstitch Fabrics. I bought it before I knew what I would do with it, but it ended up being the perfect fabric for this little project. I layered 4 different pieces of fabric, all cut to the same size and shape to make the coffee sleeve. The middle layers were leftover flannel the outer and inner layers were both the coffee fabric. After sewing the layers together I added a piece of velcro to both ends as a means to close or keep it around the cup.

{See the velcro on the left side?}

I thought about sewing the ends together, but realized that if I added velcro it could be reversible! After the first one was made, I realized how incredibly easy they are to make, so I made 10 more! {or something like 10}


These will definitely be making an appearance around the holidays as stocking stuffers. They were fun and easy to make and who doesn't want to help the environment out? :)

Nighty night,
Julia


Sunday, July 25, 2010

Just a few...

...photos from the past few weeks. Let's start out with some super cute animal plates. I love, love, love going into Anthro... such awesome visual inspiration and stimulation. I'm a sucker for their home decor sections.

{Ecureuil Plate $24}
How awesome is this plate rack?!?!? Wouldn't this be sooooo cool sitting in a corner of a dining room?! {Specifically my dining room} For a couple thousands it could have been mine...oh well. Maybe I'll be lucky enough to come across another one in a thrift/antique store.


Meeting up with a friend at Bakeshop so that she could experience how awesome their food is. Mmmmm....tomato soup and the salad of the day.


...and when it's been one of those weeks, sometimes all you need for dinner is an ice cream sundae with friends. As Rachel Ray would say: "YUM-O!"


{Bananas, chocolate ice cream, caramel, hot fudge, walnuts, cherries, cool whip}


I want this lamp real bad. It currently exists in my hair salon. I'm sure I don't want to know how much it costs, so I'll just have to be content looking at it whenever I'm in to get my hair cut. {ask for Adrienne, she's the bee's knees}

Hope you had a lovely weekend,
Julia

Tuesday, July 20, 2010

Bugs. Ewwwwww.

So...remember that wreath I made?

Well, I'm going to have to take it down soon because it's being eaten!!

{by roaches...EWWW}

I hate roaches. Ew, ew, ew...they are so disgusting. As clean as the roomies and I try to be, we just can't get rid of the roaches in the summer! They go away in the fall and winter, but come right back in the summertime. Grrr...stupid roaches. I'm going to have to throw my wreath away.

Anyways, on a prettier note - there's a boutique warehouse sale at Atlantic Station this weekend. Check it out!

Toodles,
Julia

Monday, July 12, 2010

4th of July fun

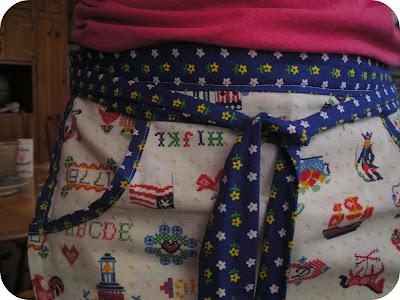
Yes, I do realize it's about a week after the 4th...but I still had to show you the apron I made that was "4th of July" themed. I found this fabric in my mom's huge stash and thought I could make something fun with it. The apron pattern I used is from One-Yard Wonders which is my favorite new tutorial/project book.


Can you see the upside down 1176 and little George Washingtons? Hahaha. Too funny.


I also made a little pouch with the same fabric and some red jersey from an old t-shirt. I still have a bunch of the fabric left...maybe I'll save it for next year and make a 4th of July outfit...

Another thing I love about seeing family over holidays is little cousins that will play with your hair...


and keep playing with your hair...


and are still playing with your hair 20 minutes later...


She's such a cutie...and it's so nice to have your hair brushed and played with for half an hour. :)

Night,
Julia

Saturday, July 10, 2010

More Freezer Paper Stenciling

I should be in Miami this weekend with my good friend Chloe, celebrating her upcoming wedding...but alas I'm not. {sad face} So, in place of myself, my bestie from HS and I have sent along a little bachelorette package. Just a few of the normal/raunchy bachelorette items along with some special handmade items!

The first project was a freezer paper stenciled tank top:


I sent along some instructions for the other gals there to make her wear it out one night. I can't wait to see photos! {Chloe, you better be wearing it!} As a last minute joke I threw together a simple veil for her to put in her hair and wear out at the same time. I figured the veil would be a good choice over the "Bride Sash" that you sometimes see at bachelorette shindigs.

Please excuse the hot mess that is my hair. I had it up in a ponytail and didn't realize I would be doing a photo shoot that day. I took one of those hair combs you can get at CVS, etc. and sewed some tulle and lace to the comb - couldn't have been easier. I'm really hoping that the girls make Chloe wear this one out, but I have a feeling this might go a little overboard on the embarrassment factor. {as a side note, I do not want anything like this for my bachelorette party, just FYI friends}

Chloe, I hope you have an amazing weekend and I can't wait to celebrate with you and Andrew on your wedding weekend. You are both awesome people and I'm so happy to have both of you in my life. :)

Love,
Julia


Tuesday, July 6, 2010

BAKESHOP

This has got to be one of my favorite "new" places in Atlanta. Bakeshop is right in Midtown at Peachtree and 8th {Next to Little Azio and Noodle}. The setting is exactly how I want my kitchen to be set up one day. Industrial kitchen meets cozy farmhouse - all merged into one.

{Photo using Hipstamatic}

For the most part I've been in for coffee and pastries in the morning when I'm down at my BF's place. The croissants are amazing, the coffee is strong and the smell of fresh bread hits your nose right as you walk in...ahhhh. Lucky for me, they had a coupon floating around so I got to try out lunch with my sister, mom, and two of my mom's friends from high school. {they meet up every summer for a ladies weekend, so cute!} Anyways, lunch for me was a half salad/half soup combo. Mixed greens with peaches, goat cheese, and candied pecans and tomato bisque. Perfect proportions, super-duper tasty!

{Photo using Hipstamatic}

Other items from our lunch included a curried chicken salad sandwich, crabcake sandwich, quiche, a red velvet cupcake and a whoopie pie. All of which was very, very tasty!

{Photo using Hipstamatic}

Check it out and let me know what you think. I have a feeling you might get as hooked as I am. You may even see me there sometime this week. :)

Toodles,
Julia

Monday, July 5, 2010

Freezer Paper Stenciling

Happy 4th of July everyone! I hope you all had a lovely weekend with friends and family.

Ready for a new project? Freezer paper stenciling it is! I've used it for another baby project, but you could use it for 'adult/older kid' projects as well. It's kind of like faux screen printing. I found directions for this project from Dana at Made. She has lots of cute ideas about what and how to stencil, so check out her tutorial.

To get started you need a few things:

freezer paper {it must be freezer paper, not wax paper or parchment paper}

an iron

permanent fabric paint

sponges or paint brushes

a blank canvas {I used baby onesies}


Step 1: Draw an image on your freezer paper while keeping in mind how big the image is in relation to your canvas.

Step 2: Cut out the 'inside' of the image. Whatever you cut out is going to be the image on your blank canvas. Make sense? You can use an exacto blade or scissors - whatever you have on hand.

Step 3: Iron your stencil onto your canvas. Make sure that all the edges of the image stick securely to your canvas. If any of them do not stick properly you will not have a clean line on your image.

Step 4: Start painting! Using sponges or brushes apply one coat to your image and let dry. For larger areas of painting or a darker canvas you will most likely need to do two or more coats of paint. {make sure you put a piece of cardboard between any layers so that paint does not seep through}

Step 5: After the paint is dry peel the stencil away from your canvas.
Step 6 and 7: {no images} Lay a scrap piece of fabric or a dishcloth over your image and iron for about a minute. Move the iron around every 30 seconds so that you don't burn the fabric. After you've ironed the image throw the item in the wash {if it's washable} turned inside out in cold water. Dry on a low heat and then iron. The image should be much softer than it was prior to washing.

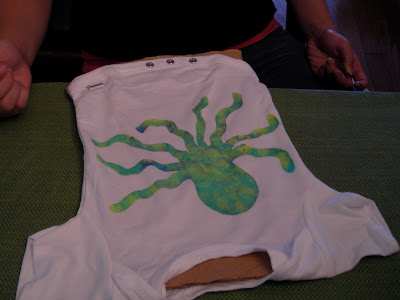
Here is how the octopus onesie turned out - I can't wait to see it on one of my
little brothers-to-be!


My sister, roommate, and I made a couple different little onesies that day, including this one for another cute baby in our lives. :)


Have a lovely evening!
Julia